TX-8270-Firware Updates
This unit has functionality to update the firmware (the system software) over a network or by the USB port. This enables us to make improvements to a variety of operations and to add features.
You can find descriptions of what's in the firmware update below and a link to download the newest firmware HERE.
The 11/24/2021 update will address the following:
1. Increase the upper limit of connectable SONOS device from 8 to 32.
2. Fix the playback format issue converted as AAC format while playing TIDAL's FLAC
audio format.
3. Fix the MQA no playback issue on TIDAL.
4. Improve reception capability in certain TuneIn Radio stations.
5. Minor bug fixes and improvements stability.
How to Update
There are two methods for updating the firmware: via network and via USB. The update may take about 20 minutes to complete for either method: via network or via USB. Furthermore, settings you have changed are maintained regardless of the method used for update.
Note that when this unit is connected to a network, you may see notifications about firmware updates on the display.
To execute updating:
- Select "Update Now" with the cursors of the remote controller and press ENTER.
- "Completed!" is displayed when the update is complete.
- There is no need to update the firmware on this unit if there is no update available.
- During an update DO NOT
- Disconnect and reconnect any cable or USB storage device, headphones, or perform any operation on the component such as turn off its power
- Accessing this unit from a PC or smartphone using an application
Updating the Firmware via Network
- Check that the unit is turned on, and the connection to the Internet is secured.
- Turn off the controller component (PC etc.) connected to the network.
- Stop any playing Internet radio, USB storage device, or server content.
- If the multi-zone function is active, turn it off.
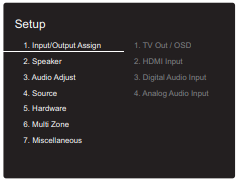
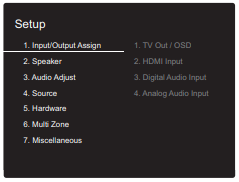
- When "5. Hardware" - "HDMI" - "HDMI CEC" is set to "On" in the Setup menu, set to "Off".
- The description may differ from the on-screen display but that will not change operations or functionality
- . Switch the input on the TV to that assigned to the unit.
- Press SETUP on the remote controller.
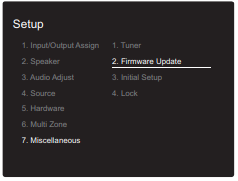
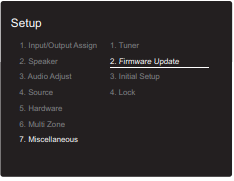
- Select "7. Miscellaneous" - "Firmware Update" -"Update via NET" with the cursors in order and press ENTER.
If "Firmware Update" is grayed out and cannot be selected, wait for a while until it starts up.
You will not be able to select "Update via NET" if there is no firmware update. - Press ENTER with "Update" selected to start update.
During the update, the TV screen may go black depending on the updated program. In that case, check the progress on the display of the unit. The TV screen will remain black until the update is complete and the power is turned on again.
"Completed!" is displayed when the update is complete. - Press ON/STANDBY on the main unit to switch the unit to standby. The process is completed and your firmware is updated to the latest version.
Do not use Power on the remote controller
If an Error Message is Displayed
When an error occurs, "*-** Error!" is displayed on the display of the unit. ("*" represents an alphanumeric character.) Check the following:
- *-01,*-.10: Cannot recognize Ethernet cable. Connect the Ethernet cable properly.
- *-02, *-03, *-04, *-05, *-06, *-11, *-13, *-14, *-16, *-17, *-18, *-20, *-21: Internet connection error. Check the following:
- Whether the router is turned on
- Whether this unit and router are connected to the network
Try to disconnect and then connect again the power to the unit and router. This may solve the problem. If you are still unable to connect to the Internet, the DNS server or proxy server may be temporarily down. Check the service status with your ISP provider.
- Others: Disconnect then reconnect the power cord, then repeat from the beginning.
Updating via USB
- Prepare a 128MB or larger USB storage device. FAT16 or FAT32 file system format.
- Media inserted in a USB card reader may not be used for this function.
- USB storage devices with security function are not supported.
- USB hubs and USB devices with hub function are not supported. Do not connect these devices to the unit.
- Delete any data stored on the USB storage device.
- Turn off the controller component (PC etc.) connected to the network.
- Stop any playing Internet radio, USB storage device, or server content.
- If the multi-zone function is active, turn it off.
- When "5. Hardware" - "HDMI" - "HDMI CEC" is set to "On" in the Setup menu, set to "Off".
- Some USB storage devices may take long to load, may not be loaded correctly, or may not be correctly fed depending on the device or their content.
- We will not be liable whatsoever for any loss or damage of data, or storage failure arising from the use of the USB storage device with this AV receiver. Thank you for your understanding.
- The description may differ from the on-screen display but that will not change the way to operate or the function.
- Connect the USB storage device to your PC.
- Download the firmware file from the our website to your PC and unzip.
Firmware files are named in the following way:
ONKAVR****_************.zip
Unzip the file on your PC. The number of unzipped files and folders varies depending on the model. - Copy all unzipped files and folders to the root folder of the USB storage device.
Make sure to copy the unzipped files. - Connect the USB storage device to the USB port on the main unit.
If you connect a USB hard disk drive to the USB port of the unit, we recommend that you use its AC adapter to power it.
If the USB storage device has been partitioned, each section will be treated as an independent device. - Switch the input on the TV to that assigned to the unit.
- Press SETUP on the remote controller
- Select "7. Miscellaneous" - "Firmware Update" -"Update via USB" with the cursors in order and press ENTER.
If "Firmware Update" is grayed out and cannot be selected, wait for a while until it starts up.
You will not be able to select "Update via USB" if there is no firmware update. - Press ENTER with "Update" selected to start update.
During the update, the TV screen may go black depending on the updated program. In that case, check the progress on the display of the unit. The TV screen will remain black until the update is complete and the power is turned on again.
During the update, do not turn off, or disconnect then reconnect the USB storage device.
"Completed!" is displayed when the update is complete - Disconnect the USB storage device from the main unit.
- Press Power ON/STANDBY on the main unit to switch the unit to standby. The process is completed and your firmware is updated to the latest version.
Do not use Power on the remote controller.
If an Error Message is Displayed
When an error occurs, "*-** Error!" is displayed on the display of the unit. ("*" represents an alphanumeric character.) Check the following:
- *-01, *-10: USB storage device not found. Check whether the USB storage device or USB cable is correctly inserted to the USB port of this unit. Connect the USB storage device to an external power
source if it has its own power supply. - *-05, *-13, *-20, *-21: The firmware file is not present in the root folder of the USB storage device, or the firmware file is for another model. Retry from the download of the firmware file.
- Others: Disconnect then reconnect the power cord, then repeat from the beginning.
Disclaimer: The program and accompanying online documentation are furnished to you for use at your own risk. We will not be liable and you will have no remedy for damages for any claim of any kind whatsoever concerning your use of the program or the accompanying online documentation, regardless of legal theory, and whether arising in tort or contract. In no event will we be liable to you or any third party for any special, indirect, incidental, or consequential damages of any kind, including, but not limited to, compensation, reimbursement or damages on account of the loss of present or prospective profits, loss of data, or for any other reason whatsoever.
Comments
0 comments
Article is closed for comments.