TX-RZ50 - Speaker Connections
Connecting your speakers to your Onkyo TX-RZ50 is a very easy task, but there are some guidelines to follow. Read this article fully to ensure you are connecting everything properly.
Speakers you can use with this unit
This unit supports speakers with 4 Ω - 16 Ω impedance. For speaker impedance, check the speaker instruction manual.
NOTE: If any of the speakers to be connected has an impedance of 4 Ω or more and less than 6 Ω, set "Speaker Impedance" to "4ohms" for "Speaker Setup" in the Initial Setup section. When setting "Speaker Impedance" from the Setup menu, press on the remote controller, and set "2. Speaker" - "Configuration" - "Speaker Impedance" to "4ohms".
Connect the Speaker Cables
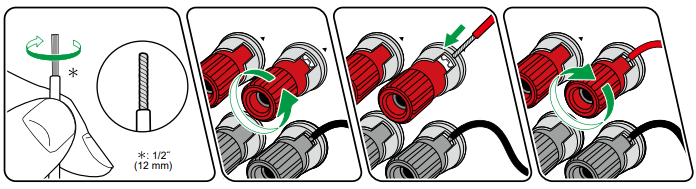
Make correct connection between the unit's jacks and speaker's jacks (+ side to + side, and - side to - side) for each channel.
NOTE: If the connection is wrong, a bass sound will not be reproduced properly due to reverse phase.
Twist the wires exposed from the tip of the speaker cable so that the wires do not stick out of the speaker terminal when connecting.
NOTE: If the exposed wires touch the rear panel, or the + side and – side wires touch each other, a malfunction may occur

Connect the Subwoofer
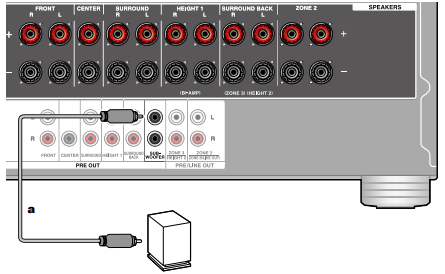
Connect a powered subwoofer with this unit using a standard RCA cable. Up to two powered subwoofers can be connected to this receiver at a time. The same signal is sent from each SUBWOOFER PRE OUT jack.
Connect Speakers to Receiver
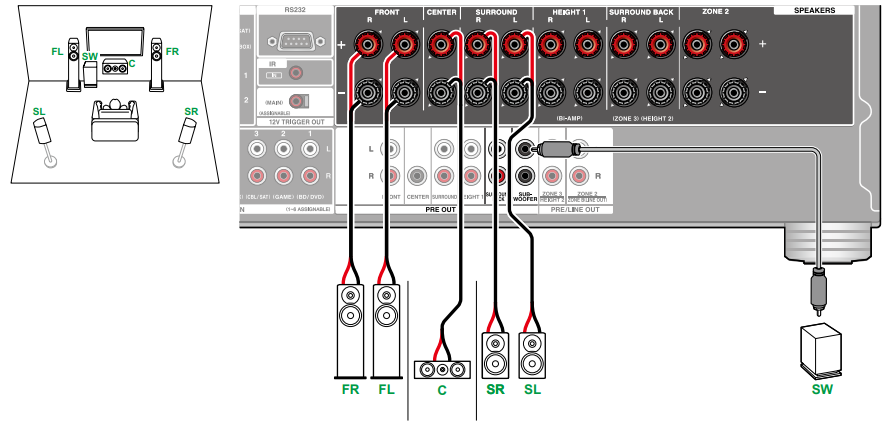
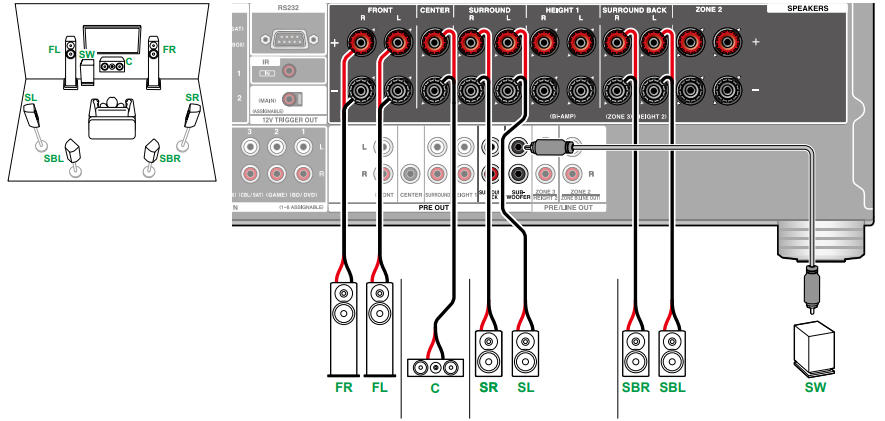
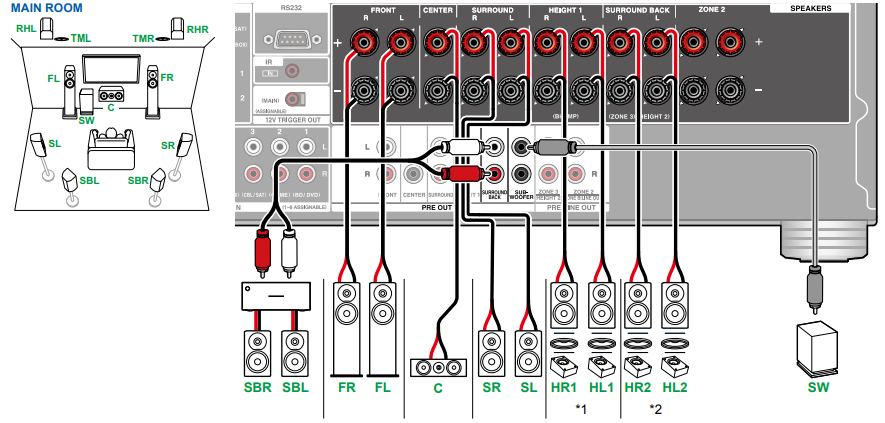
5.1 Channel System
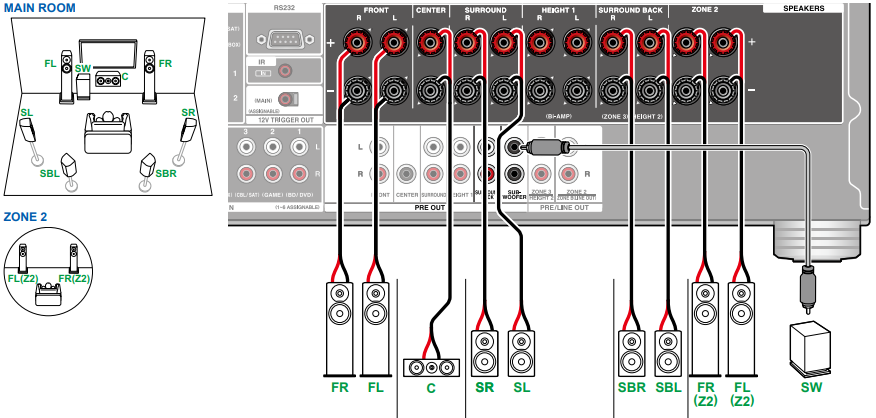
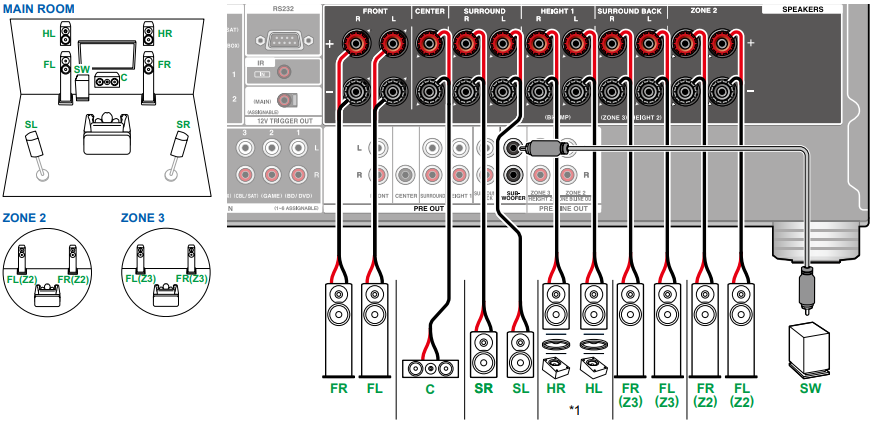
5.1 Channel System + ZONE Speaker

NOTE: To output audio from an externally connected AV component to ZONE 3, use an analog audio cable for connection. Note that ZONE 3 output is not possible with the connection using a HDMI cable, digital coaxial cable, or digital optical cable.
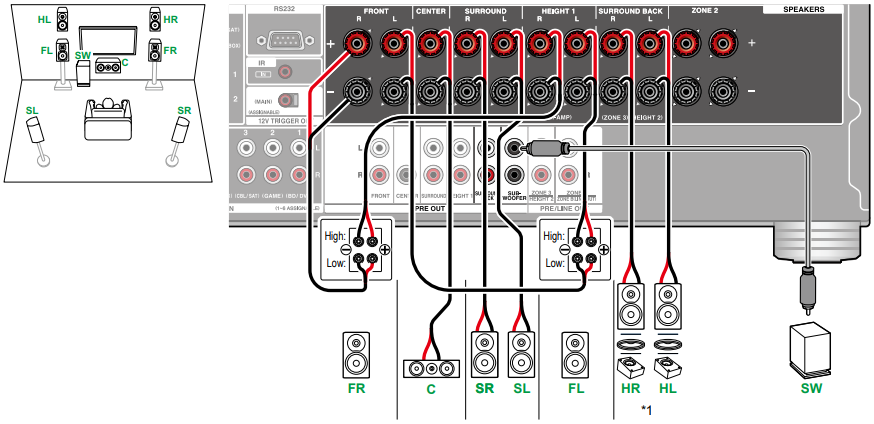
5.1 Channel System (Bi-Amping the Speakers)
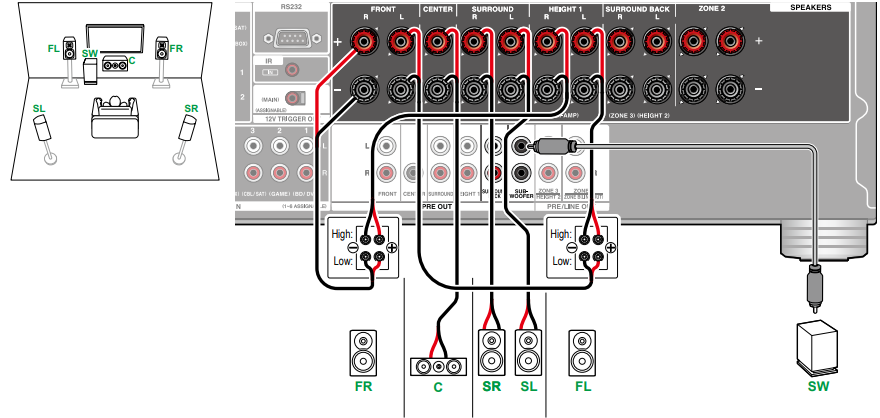
NOTE: Be sure to remove the jumper bar connecting between the woofer jacks and tweeter jacks of the Bi-Amping supported speakers. Refer to the instruction manual of your speakers as well.
7.1 Channel System
7.1 Channel System + ZONE Speaker
7.1 Channel System (Bi-Amping the Speakers)

NOTE: Be sure to remove the jumper bar connecting between the woofer jacks and tweeter jacks of the Bi-Amping supported speakers. Refer to the instruction manual of your speakers as well.
5.1.2 Channel System
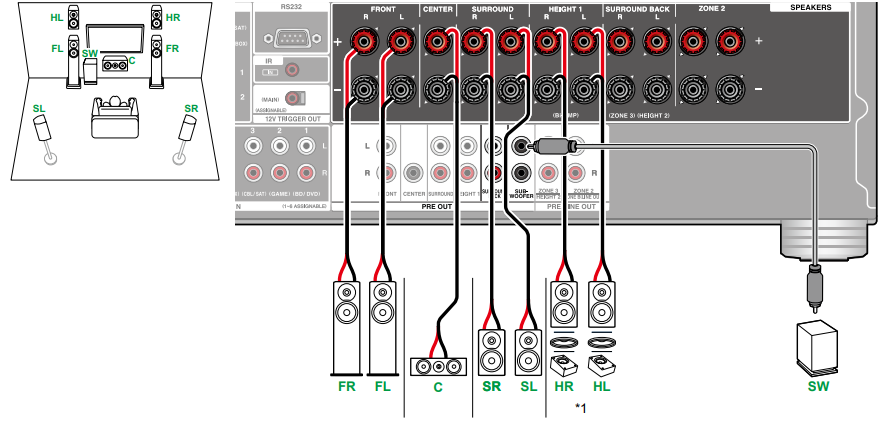
*Connect the Height Speakers you have actually installed (HL/HR: Height Speakers, Top Speakers, Dolby Enabled Speakers)
5.1.2 Channel System + ZONE Speaker
*Connect the Height Speakers you have actually installed (HL/HR: Height Speakers, Top Speakers, Dolby Enabled Speakers)
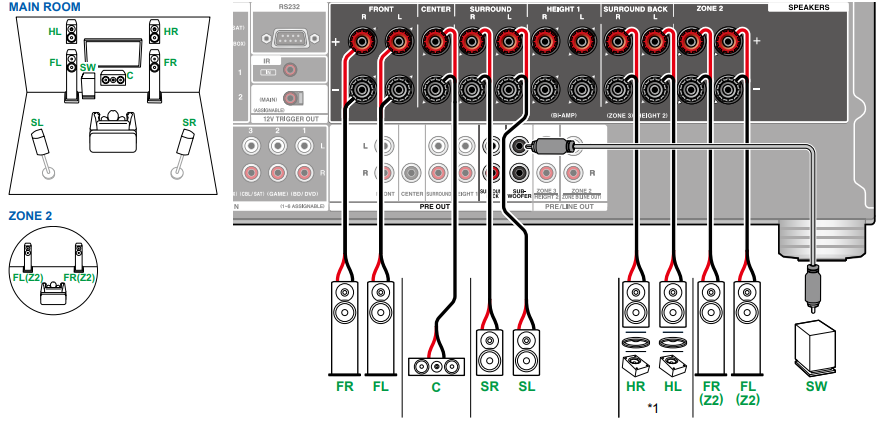
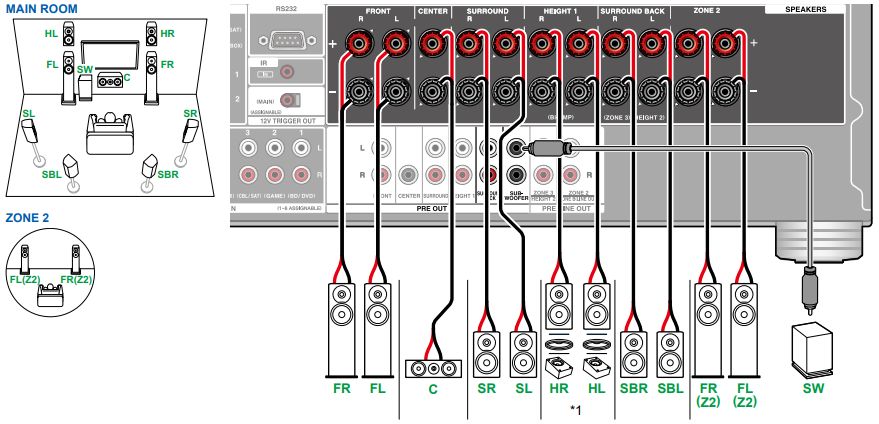
5.1.2 Channel System + ZONE 2/ZONE 3 Speaker
*While ZONE 2/ZONE 3 layback is being performed, Height 1 speakers installed in the main room cannot play audio.
*Connect the Height Speakers you have actually installed (HL/HR: Height Speakers, Top Speakers, Dolby Enabled Speakers)
5.1.2 Channel System (Bi-Amping the Speakers)
NOTE: Be sure to remove the jumper bar connecting between the woofer jacks and tweeter jacks of the Bi-Amping supported speakers. Refer to the instruction manual of your speakers as well.
*Connect the Height Speakers you have actually installed (HL/HR: Height Speakers, Top Speakers, Dolby Enabled Speakers)
7.1.2 Channel System

7.1.2 Channel System + ZONE Speaker
*While ZONE 2 layback is being performed, Height 1 speakers installed in the main room cannot play audio.
*Connect the Height Speakers you have actually installed (HL/HR: Height Speakers, Top Speakers, Dolby Enabled Speakers)
5.1.4 Channel System
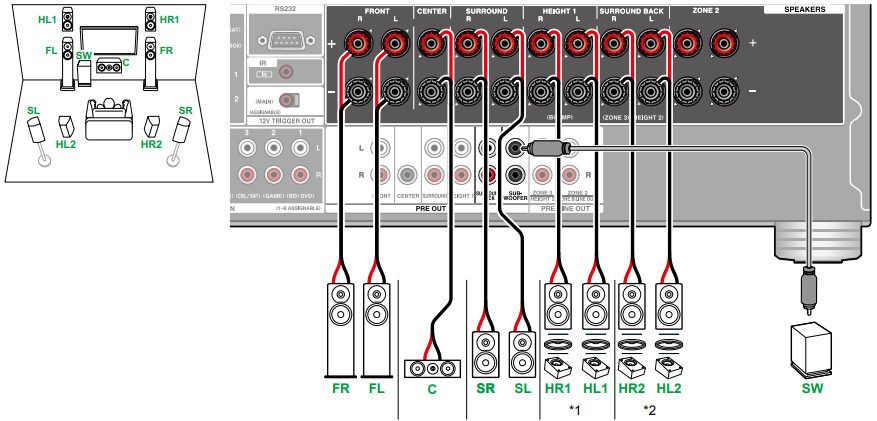
*Connect the Height Speakers you have actually installed (HL1/HR1: Front Height Speakers, Top (front side) Speakers, Dolby Enabled Speakers (Front)).
*Connect the Height Speakers you have actually installed (HL2/HR2: Rear Height Speakers, Top (rear side) Speakers, Dolby Enabled Speakers (Surround)).
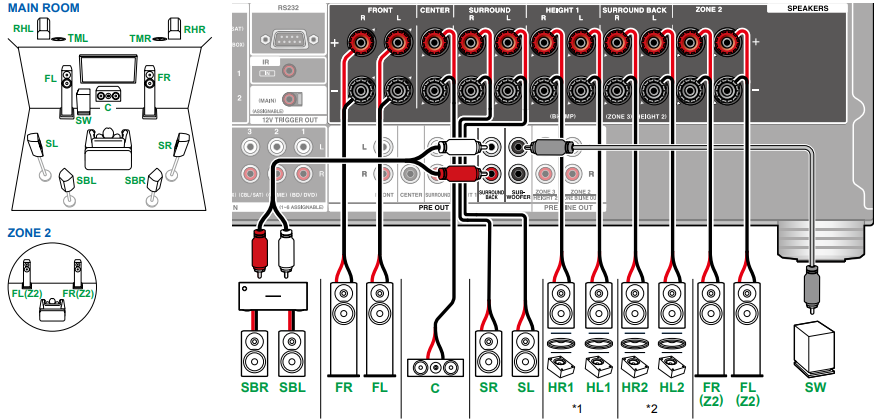
5.1.4 Channel System + ZONE Speaker

NOTE: While ZONE 2 playback is being performed, Height 1 speakers installed in the main room cannot play audio.
*Connect the Height Speakers you have actually installed (HL1/HR1: Front Height Speakers, Top (front side) Speakers, Dolby Enabled Speakers (Front)).
*Connect the Height Speakers you have actually installed (HL2/HR2: Rear Height Speakers, Top (rear side) Speakers, Dolby Enabled Speakers (Surround)).
7.1.4 Channel System
*Connect the Height Speakers you have actually installed (HL1/HR1: Front Height Speakers, Top (front side) Speakers, Dolby Enabled Speakers (Front)).
*Connect the Height Speakers you have actually installed (HL2/HR2: Rear Height Speakers, Top (rear side) Speakers, Dolby Enabled Speakers (Surround)).
7.1.4 Channel System + ZONE Speaker
NOTE: While ZONE 2 playback is being performed, Height 1 speakers installed in the main room cannot play audio.
*Connect the Height Speakers you have actually installed (HL1/HR1: Front Height Speakers, Top (front side) Speakers, Dolby Enabled Speakers (Front)).
*Connect the Height Speakers you have actually installed (HL2/HR2: Rear Height Speakers, Top (rear side) Speakers, Dolby Enabled Speakers (Surround)).
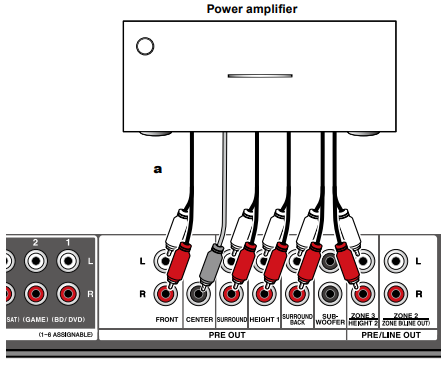
Connecting a Power Amplifier
You can connect a power amplifier to the unit and use the unit as a pre-amplifier in order to produce a large volume that cannot be output with the unit only. Connect the speakers to the power amplifier. For details, refer to the power amplifier's instruction manual.
Use the PRE OUT jacks for connection as shown below:
Comments
17 comments
Hi, I own an RZ50, is there a way to run a 5.1.4 configuration with bi-amping the front speakers?
Hello Lukas,
Unfortunately, the TXRZ50 can only be configured for 5.1.2 when being used in in a Bi-amp configuration. In order to achieve 5.1.4ch you can't use the bi amp configuration on the TXRZ50 since it's a 9 ch receiver. However, if go with the 11 channel receiver like the TXRZ70 then you can achieve 5.1.4ch in Bi-amp setup.
Thank you
Jennifer
Can I connect zone 2 speakers via external amp, and connect zone 3 speakers to speaker jacks on TX-RZ50?
Hello Gary,
Yes, you can have the zone 2 on the separate amp to power the speakers and then the other be powered by the receiver. But please be aware when you hook up the zone 3 speakers into the receiver directly that you would be taking away from one of the surround terminals to be able to power those speakers.
Thank you
Jennifer
You must preout only the SB for a 7.1.4? Can I preout the Fronts and center and still achieve a 7.1.4? My fronts and center are full and would like to unload them from the RZ50.
Hello Andy,
Unfortunately, that is the design is to have the powered amp be connected to the Surround Back pre out to provide the 7.1.4 speaker configuration.
Thank you
Jennifer
Can this system use banana connectors? We are using plain wires and want to switch to wires we can just plug in.
Hello Kevin,
Yes, the TXRZ50 has the ability of being connected with banana plugs to hook up your speaker wires. Use a plug 4 mm in diameter, Y plug connection are not supported.
Thank you
Jennifer
Hi - how do I tell my rz-50 that I'm using an external amp for the fronts? The configurations screen doesn't let you turn off fronts. Am I missing something? I have the latest firmware, I know how to connect the amp and speakers. Just don't know how to set the config properly using osd menu, mobile app. (I haven't tried the webapp though yet).
I have 5.1.4 (when not external amp).
Hello Deepak Nair,
There is no internal function within the menu to let the receiver know that you are using the pre outs with an external for the speakers to be powered by. When you use the external amp the internal amps of the receiver will always be active, there is no way of disabling them.
Thank you
Jennifer
Hello,
Is it normal that rear height speakers are not shown as active in the display? The display only ever shows a maximum of 7 speakers (+ subwoofer) as active, even though a 5.1.4 system is running. This is very irritating.
Hello Björn Köppler
What the surround mode that is being displayed on the front panel of the unit?
Thank you
Jennifer
Sorry but I'm still confused about the Zone 2 A & B speaker connections. This is the second Onkyo receiver I have owned & had no problems in connecting the Zone 2 A & B speakers each in a different room & each with a integrated Amp. Been having sound issues. In the manual, in the speaker connections it shows Zone 2A speakers being wired directly to the receiver. Then in another place it says to use an integrated amp. Same for the Zone 2 B. Then here on this page it is different again. So should I be using an amp on both Zone 2 A & B speakers that are each in a different room than the receiver?
Hello Jerry,
If you could give me more information on what you are wanting to do. Are you wanting to use another amp to drive zone 2 speakers or you are just wanting to use the receiver's built amp to drive the zone 2 speakers? Zone B can be used for like head phones, a transmitter device or an amp. But again if you could provide more of what you are wanting do we can work it out.
Thank you
Jennifer
I am a bit confused with my speaker connections with my rz50. I have front left and right mains, center channel, a subwoofer, two front height speakers and two rear surrounds? Is this 7.1 or 5.1.2 as I cannot seem to get the rear surrounds working. I know where the fronts, centers and sub goes but the rest of the connections are a bit of a mystery. I have no surround sides.
Hello Paul,
By the speaker layout that you are providing that is a 5.1.2. For the rear speakers, they need to be connected in the terminals labels Surrounds. Even though they are not going to be on the side but behind you they need to be in the surround terminals for a 5.1.2 configuration. When you put them into surround terminals then run the test tones to make sure that you are getting sound out of them.
Thank you
Jennifer.
Thanks Jennifer. I appreciate it.
Please sign in to leave a comment.