TX-NR5100 - Setup Menu -Hardware
HDMI
Change the settings of the HDMI function.
HDMI CEC
Default Value: On
Setting this to "On" enables the input selection link and other link functions with HDMI-connected CEC-compatible device. When this setting is changed, turn off and then on again the power of all
connected devices.
- Depending on the TV to use, a link setting may be required on the TV.
- This function is effective only when the device is connected to the HDMI OUT MAIN terminal.
- Setting this to "On" and closing the operation screen will display the name of the connected CEC-compatible device and "CEC On" on the main unit’s display.
- When this function is set to "On", the power consumption in standby state increases, however, the increase in power consumption is minimized by automatically entering the HYBRID STANDBY mode where only the essential circuits operate.
- If you operate the MASTER VOLUME dial on the main unit when this setting is "On" and audio is output from the TV speakers, audio will be output also from the speakers connected to this unit. To output audio from only either of them, change the setting of this unit or TV, or reduce the volume of this unit.
- If abnormal behavior is observed when this is set to "On", set it to "Off".
- If a connected device is not CEC-compatible, or if you are not sure whether it is compatible, set it to "Off".

HDMI Standby Through
Default Value: Auto (Eco)
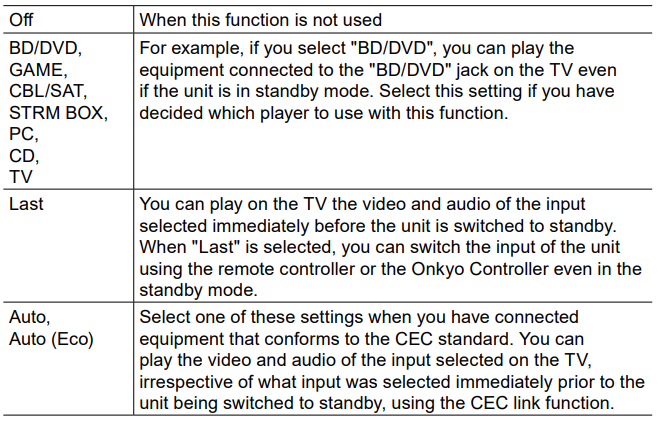
When this is set to anything other than "Off", you can play the video and audio of an HDMI-connected player on the TV even if the unit is in standby mode. Also, only "Auto" and "Auto (Eco)" can be selected if "HDMI CEC" is set to "On". If you select anything else, set "HDMI CEC" to "Off".
- When this function is set to a value other than "Off", the power consumption in standby state increases, however, the increase in power consumption is minimized by automatically entering the HYBRID STANDBY mode where only the essential circuits operate.
- To play a non-CEC compliant player on the TV, turn the unit on and switch the input.
- When using a CEC-compliant TV, you can reduce the power consumption in standby mode by selecting "Auto (Eco)".
Audio TV Out
Default Value: Auto
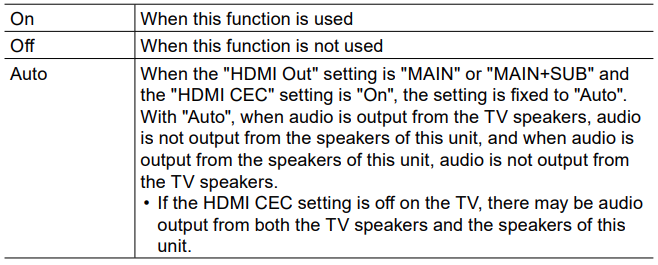
You can enjoy audio through the speakers of the TV while this unit is on.
- This setting is fixed to "Auto" if you set "1. Input/Output Assign" - "TV Out/OSD" - "HDMI Out" or "HDMI" - "HDMI Out" in the "Quick Menu" to "MAIN" or "MAIN+SUB" and set "HDMI CEC" to "On". If you change this setting, set "HDMI CEC" to "Off".
- Listening mode cannot be changed while "Audio TV Out" is set to "On" and audio is being output from the TV.
- Depending on your TV or input signal of the connected device, audio may not be output from the TV even if this is set to "On". In such a case, audio is output from the speakers of the unit.
- Audio is output from this unit if you operate the MASTER VOLUME dial on this unit when audio that is input to this unit is output from your TV speakers. If you do not want to output audio, change the setting of this unit or TV, or reduce the volume of this unit.
Audio Return Channel (eARC supported)
Default Value: On
You can enjoy the sound of an HDMI-connected ARC-compatible TV or eARCcompatible TV through the speakers connected to the unit.

Auto Lip Sync
Default Value: On
Automatically corrects desynchronization between the video and audio signals based on the information from the HDMI Lip-Sync-compatible TV.

Network
Change the settings of the Network function.
- When LAN is configured with a DHCP, set "DHCP" to "Enable" to configure the setting automatically. ("Enable" is set by default) To assign fixed IP addresses to each components, you must set "DHCP" to "Disable", assign an address to this unit in the "IP Address" setting, and set information related to your LAN, such as Subnet Mask and Gateway.
Wi-Fi
Default Value: Off(Wired)
Connect the unit to the network via a wireless LAN router.
- When switching between "On" and "Off(Wired)", stop the Network service. Also, when group playback is in process, cancel the group playback once, and then switch the setting.

Wi-Fi Setup
Default Value: -
Configure wireless LAN settings by pressing ENTER with "Start" displayed.
Wi-Fi Status
Default Value: -
The information of the connected access point is displayed.

MAC Address
Default Value: -
Check the MAC address of this unit. This value is specific to the component and cannot be changed.
DHCP
Default Value: Enable

IP Address
Default Value: 0.0.0.0

Subnet Mask
Default Value: 0.0.0.0

Gateway
Default Value: 0.0.0.0

DNS Server
Default: 0.0.0.0

Proxy URL
Default Value: -

Proxy Port
Default Value: 8080

Friendly Name
Change the model name of this unit which is displayed on the device connected to the network to an easily recognized name.
- Press ENTER to display the Edit screen.
- Select a character or symbol with the cursors, and press ENTER. Repeat this operation to input up to 31 characters.
"A/a": Switches between upper and lower cases. (Pressing MODE on the remote controller also toggles between upper and lower cases)
"←" "→": Moves the cursor in the arrow direction. : Removes a character on the left of the cursor.
 : Enters a space.
Pressing CLEAR on the remote controller will remove all the input characters.
3. After inputting, select "OK" with the cursors, and press ENTER. The input name will be saved.
AirPlay
Default: On
Select whether or not to use the AirPlay function.

AirPlay Device Name
Default Value: Onkyo TX-NR5100 XXXXXX
Change the model name of this unit which is displayed on the AirPlay connected device to an easily recognized name.
- Press ENTER to display the Edit screen.
- Select a character or symbol with the cursors, and press ENTER.
Repeat this operation to input up to 31 characters.
"A/a": Switches between upper and lower cases. (Pressing MODE on the remote controller also toggles between upper and lower cases) - "←" "→": Moves the cursor in the arrow direction.: Removes a character on the left of the cursor.: Enters a space.
Pressing CLEAR on the remote controller will remove all the input characters. - After inputting, select "OK" with the cursors, and press ENTER. The input name will be saved.
This function cannot be used when registering this unit to Home App.
AirPlay Password
Default Value: -
You can set a password of up to 31 characters so that only users that have input can use AirPlay.
- Press ENTER to display the Edit screen.
- Select a character or symbol with the cursors, and press ENTER. Repeat this operation to input up to 31 characters.
"A/a": Switches between upper and lower cases. (Pressing MODE on the remote controller also toggles between upper and lower cases)
"←" "→": Moves the cursor in the arrow direction.: Removes a character on the left of the cursor.: Enters a space.
To select whether to mask the password with "" or display it in plain text, press MEMORY on the remote controller.
Pressing CLEAR on the remote controller will remove all the input characters. - . After inputting, select "OK" with the cursors, and press ENTER. The input password will be saved.
This function cannot be used when registering this unit to Home App.
Privacy Statement
Default Value: Not Accepted
When using a network service that requires a login name, email address, password, etc., you need to agree to the Privacy Statement of our company.
- This setting can be made after confirming the Privacy Statement. When you select "Privacy Statement" and press ENTER, the Privacy Statement is displayed.
- When "Not Accepted" is selected, you will log out from the network service you have logged in.
Network Check
Default Value: -
You can check the network connection. Press ENTER when "Start" is displayed.
- Wait for a while if "Network" cannot be selected. It can be selected when the network function is activated.
Comments
0 comments
Please sign in to leave a comment.