TX-8260-Setup Menu
The unit allows you to configure advanced settings to provide you with an even better experience.
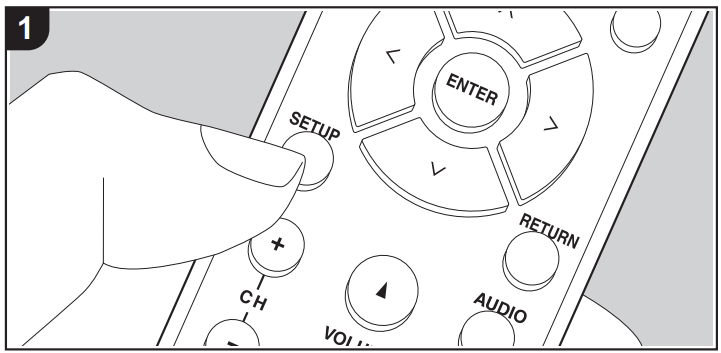
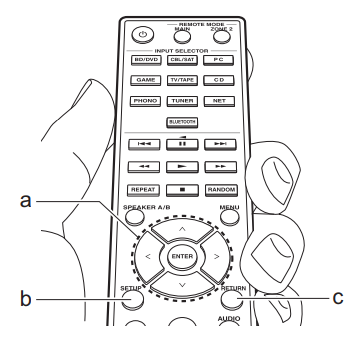
- Press SETUP (b) on the remote controller.

- Select the item with the Up/Down buttons (a) on the remote controller and press ENTER (a) to confirm your selection.
- Select the submenu with the Up/Down buttons (a) on the remote controller.
- Select the setting value with the Left/Right buttons (a) on the remote controller and press ENTER (a) to confirm your selection.
To return to the previous display, press RETURN (c) . - To exit the settings, press SETUP (b) .
Digital Audio
You can change input assignment between the input selectors and DIGITAL IN COAXIAL/OPTICAL jacks. If you do not assign a jack, select "---".
- COAX1
- "BD/DVD"
- "CBL/SAT"
- "GAME"
- "PC"
- "CD"
- "TV/TAPE"
- "PHONO": Allocate an input selector to the DIGITAL IN COAXIAL 1 jack. (Default Value is "BD/DVD")
- COAX2
- "BD/DVD"
- "CBL/SAT"
- "GAME"
- "PC"
- "CD"
- "TV/TAPE"
- "PHONO": Allocate an input selector to the DIGITAL IN
- COAXIAL 2 jack. (Default Value is "CBL/SAT")
- OPT1
- "BD/DVD"
- "CBL/SAT"
- "GAME"
- "PC"
- "CD"
- "TV/TAPE"
- "PHONO": Allocate an input selector to the DIGITAL IN
- OPTICAL 1 jack. (Default Value is "GAME")
- OPT2
- "BD/DVD"
- "CBL/SAT"
- "GAME"
- "PC"
- "CD"
- "TV/TAPE"
- "PHONO": Allocate an input selector to the DIGITAL IN
- OPTICAL 2 jack. (Default Value is "TV/TAPE")
-
Supported sampling rates for PCM signals (stereo, mono) from a digital input are 32 kHz, 44.1 kHz, 48 kHz, 88.2 kHz, 96 kHz/16 bit, 20 bit, 24 bit, 176.4 kHz, 192 kHz/16bit, 20bit, 24bit.
Main Volume
Max Vol-Set the maximum value to avoid too high volume. Select "Off (default value)" or a value between "50" to "99".
POn Vol-Set the volume level of when the power is turned on. Select "Last (default value)" (volume level before entering standby mode), "Min", "0.5" to "99.5" and "Max".
- You cannot set a higher value than that of "Max Vol".
HP Lvl-Adjust the output level of the headphones. Select from "-12.0 dB" to "+12.0 dB". (Default Value is "0.0 dB")
Hardware
SpImpedance-Set the impedance of the connected speakers. "4 Ohms": When any of the connected speakers have 4 Ohms or more to less than 6 Ohms impedance, or when speaker systems are connected to both of the SPEAKERS A/B terminals "6 Ohms (default value)": When the connected speakers all have 6 Ohms or more impedance.
- Note that when connecting to both SPEAKERS A and B terminals, connect speakers with 8 Ohms to 16 Ohms impedance to both A and B.
- For impedance, check the indications on the back of the speakers or their instruction manual.
Auto Stb- This setting places the unit on standby automatically after 20 minutes of inactivity without any audio input. (When "NET Stby" is on, this becomes the HYBRID STANDBY mode which reduces the increase in power consumption to a minimum.)
"On": The unit will automatically enter standby mode. "AUTO STBY" lights on the display.
"Off": The unit will not automatically enter standby mode.
- "Auto Stby" is displayed on the display 30 seconds before the Auto Standby comes on.
- "Auto Stby" does not work when ZONE 2 is active.
- Default values vary depending on the regions.
NET Stby-When this feature is turned "On (default value)", you can turn on the power of the unit via the network using an application that can control this unit.
- When using "NET Stby", power consumption increases even when this unit is on standby, however, the increase in power consumption is kept to a minimum by automatically entering the HYBRID STANDBY mode, where only essential circuits are operating.
- When the connection to the network is lost, "NET Stby" is disabled to reduce power consumption. Use the power button on the remote controller or main unit to turn the unit on if this happens.
BT Wakeup-This function wakes up the unit on standby by connecting a BLUETOOTH wireless technology enabled device.
"On": When this function is to be used
"Off (default value)": When this function is not to be used
- When this setting is turned "On", power consumption increases even when this unit is on standby, however, the increase in power consumption is kept to a minimum by automatically entering the HYBRID STANDBY mode, where only essential circuits are operating.
- The setting is fixed to "Off" if "7. Bluetooth" - "AutoChange" is set to "Off".
Opt1-Wkup When an audio signal is input through the OPTICAL 1 terminal while this unit is in standby, this feature automatically detects it.
"Main": This unit is turned on and outputs the audio in the main room.
"Zone2": ZONE 2 is turned on and outputs the audio in the separate room.
"Both": This unit is turned on, ZONE 2 is turned on, and audio is output in both the main room and in the separate room.
"Off (default value)": The function is disabled.
- When a cable is connected to the OPTICAL 1 terminal and this setting is enabled, power consumption increases even when the unit is on standby, however, the increase in power consumption is kept to a minimum by automatically entering the HYBRID STANDBY mode, where only essential circuits are operating.
- "The Opt1Wkup feature does not work when the unit is in the mode for controlling ZONE 2.
AM/FM-Select a frequency step depending on your area of residence. Select "9k/0.05M" or "10k/0.2M (default value)".
- When this setting is changed, all radio presets are deleted.
Source
Intelli-Adjust the volume level difference between the devices connected to the unit. Select the input selector to configure. Select from "-12 dB" to "+12 dB". Set a negative (-) value if the volume of the target device is larger than the others and a positive (+) value if smaller. To check the audio, start playback of the connected device. (Default Value is "0 dB")
- This function is not effective in ZONE 2.
Name Edit-Set an easy name to each input. The set name will be shown on the main unit display. Select the input selector to configure.
- To name a preset radio station, press TUNER on the remote controller, select AM/FM and select the preset number.
- It cannot be set if the "NET" or "BLUETOOTH" input is selected.
Zone2
Z2Out-If the amplifier you connected for the multi-room feature doesn't enable you to adjust the volume, you can adjust the volume, balance, bass, and treble for ZONE 2 on this unit.
"Fixed": (default value): Adjust the volume and sound quality on the amplifier for ZONE 2.
"Variable": You can adjust the volume and sound quality on this unit.
Z2MaxVo-Set the maximum volume for the volume control of ZONE 2. Select "Off (default value)" or a value between "50" to "99".
- You can set this only when “Z2Out” is set to “Variable”.
Z2POVl-Set the volume for when the unit of ZONE 2 is turned on. Select "Last (default value)" (volume level before entering standby mode), "Min", "0.5" to "99.5" and "Max".
- You can set this only when “Z2Out” is set to “Variable”.
Network
When LAN is configured with a DHCP, set "DHCP" to "Enable" to configure the setting
automatically. Further, to assign fixed IP addresses to each component, you must set "DHCP" to "Disable" and assign an address to this unit in "IP Address" as well as set information related to your LAN, such as Subnet Mask and Gateway.
Wi-Fi-Connect the unit to network via wireless LAN router.
"On": Wireless LAN connection
"Off (default value)": To connect via wired LAN
Wi-Fi Setup-You can configure wireless LAN settings by pressing ENTER when "Start" is displayed.
- This is displayed only when "On" is selected in "Wi-Fi".
- Refer to Initial Setup (P13) for Wi-Fi settings.
SSID-The SSID of the connected access point
Signal-The signal strength of the connected access point
Stat-The status of the connected access point
MAC Address-This is the MAC address of this unit. This value is specific to the component and cannot be changed.
DHCP "Enable-(default value)": Auto configuration by DHCP "Disable": Manual configuration without DHCP
If "Disable" is selected, you must set "IP Address", "Subnet Mask", "Gateway", and "DNS Server" manually.
IP Address-Displays/Sets the IP address.
Subnet Mask-Displays/Sets the subnet mask.
Gateway-Displays/Sets the gateway.
DNS Server-Displays/Sets the primary DNS server.
Proxy UR-Displays/Sets the proxy server URL.
Proxy Port-Displays/Sets the proxy server port number when you enter "Proxy URL".
Friendly Name-Change the device name for this unit which is shown on other devices connected to the network to an easily recognized name.
This is set to Onkyo TX-8260 ****** at the time of purchase. (*stand for alphanumeric characters identifying each unit) For details on how to enter text, refer to "Entering text".
AirPlay PW-You can set a password of up to 31 characters so that only registered users can use AirPlay.
Network Check-You can check the network connection. Press ENTER when "Start" is displayed.
- Wait for a while if "Network" cannot be selected. It will appear when the network feature is started.
Bluetooth
Bluetooth Select whether or not to use the BLUETOOTH function. "On (default value)": Enables connection with a BLUETOOTH wireless technology enabled device by using the BLUETOOTH function.
Select "On" also when making various BLUETOOTH settings.
"Off": When the BLUETOOTH function is not to be used .
AutoChange-The input of the unit will automatically be switched to "BLUETOOTH" when connection is made from a BLUETOOTH wireless technology enabled device to the unit.
"On (default value)": The input will automatically become "BLUETOOTH" when a BLUETOOTH wireless technology enabled device is connected.
"Off": The function is disabled.
- If the input is not switched automatically, set to "Off" and change the input manually.
Reconnect-This function automatically reconnects to the BLUETOOTH wireless technology enabled device connected last when you change the input to "BLUETOOTH".
"On (default value)": When this function is to be used
"Off": When this function is not to be used
- This may not work with some BLUETOOTH wireless technology enabled devices.
Pairing Info-You can initialize the pairing information saved on this unit. Pressing ENTER when "Clear" is displayed initializes the pairing information stored in this unit.
- This function does not initialize the pairing information on the BLUETOOTH wireless technology enabled device. When pairing the unit again with the device, be sure to clear the pairing information on the BLUETOOTH wireless technology enabled device in advance. For information on how to clear the pairing information, refer to the BLUETOOTH wireless technology enabled device's instruction manual.
Device-Displays the name of the BLUETOOTH wireless technology enabled device connected to the unit.
- The name is not displayed when "Stat" is "Ready" or "Pairing".
Stat-Displays the status of the BLUETOOTH wireless technology enabled device connected to the unit.
"Ready": Not paired
"Pairing": Pairing
"Connected": Successfully connected
- Wait for a while if "Bluetooth" cannot be selected. It will appear when the BLUETOOTH function is started up.
F/W Update
Notice-Availability of a firmware update will be notified via network.
"Enable (default value)": Notify updates
"Disable": Disable notifications
Ver-The current firmware version will be displayed.
Update via NET-Press ENTER to select when you want to update the firmware via network.
- You will not be able to select this setting if you do not have Internet access or there is nothing to update.
Update via USB-Press ENTER to select when you want to update the firmware via USB.
- You will not be able to select this setting if a USB storage device is not connected or there is nothing to update in the USB storage device.
- Wait for a while if "Firmware Update" cannot be selected. It will appear when the network feature is started.
Lock
Setup-Lock the Setup menu to protect the settings.
"Locked": The menu is locked.
"Unlocked (default value)": Unlocked
Comments
0 comments
Please sign in to leave a comment.