PR-SC5507-Using the Remote Control
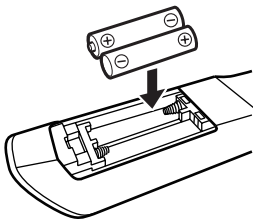
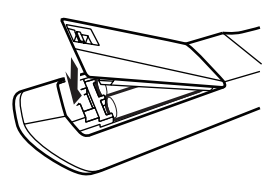
Installing the Batteries
- To open the battery compartment, press the small lever and remove the cover

- Insert the two supplied batteries (AA/R6) in accordance with the polarity diagram inside the battery compartment
- Replace the cover and push it shut
Please Note
- If the remote controller doesn’t work reliably, try replacing the batteries.
- Don’t mix new and old batteries or different types of batteries
- If you intend not to use the remote controller for a long time, remove the batteries to prevent damage from leakage or corrosion
- Expired batteries should be removed as soon as possible to prevent damage from leakage or corrosion
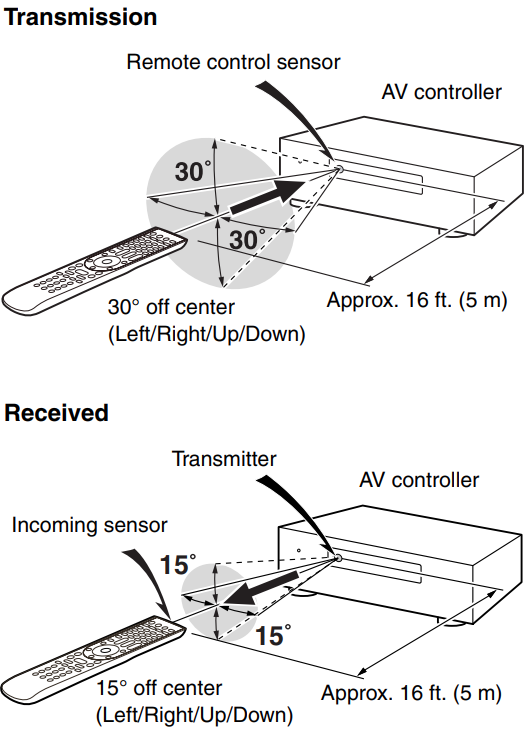
Aiming the Remote Controller
To use the remote controller, point it at the AV controller’s remote control sensor, as shown below.
Please Note
- The remote controller may not work reliably if the AV controller is subjected to bright light, such as direct sunlight or inverter-type fluorescent lights. Keep this in mind when installing.
- If another remote controller of the same type is used in the same room, or the AV controller is installed close to equipment that uses infrared rays, the remote controller may not work reliably.
- Don’t put anything, such as a book, on the remote controller, because the buttons may be pressed inadvertently, thereby draining the batteries.
- The remote controller may not work reliably if the AV controller is installed in a rack behind colored glass doors. Keep this in mind when installing.
- The remote controller will not work if there’s an obstacle between it and the AV controller’s remote
control sensor. - When the remote control codes have been registered and you want to operate another component, or when you want to operate an Onkyo component without u connection, point the remote controller at the other component to use it.
- When you want to operate an Onkyo component with RI connection or an RHD-compatible component connected via HDMI, point the remote controller at the AV controller’s remote
control sensor.
Remote Control Buttons
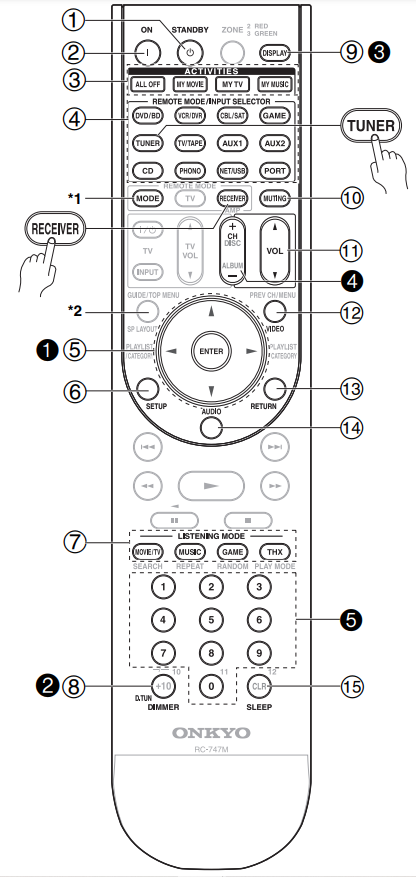
Controlling the AV Controller
To control the AV controller, press the [RECEIVER] button to select Receiver mode.
You can also use the remote controller to control your DVD/BD player, CD player, and other components.
- STANDBY button-Sets the AV controller to Standby
- ON button-Turns on the AV controller
- ACTIVITIES buttons-Used with the MACRO function
- REMOTE MODE/INPUT SELECTOR buttons-Selects the remote controller modes and the input
sources - Arrow ^/v/</> and ENTER buttons-Used to select and adjust settings
- SETUP button-Used to change settings
- LISTENING MODE buttons-Used to select the listening modes
- DIMMER button-Adjusts the display brightness
- DISPLAY button-Displays information about the current input source
- MUTING button-Mutes or unmutes the AV controller
- VOL ^/v button-Adjusts the volume of the AV controller regardless of the currently selected remote controller mode
- VIDEO button-Used to change video settings
- RETURN button-Returns to the previous display when changing settings
- AUDIO button-Used to change audio settings. When the “Audio TV Out” setting is set to “On”, this button is disabled
- SLEEP button-Used with the Sleep function
*1 When you want to change the remote controller mode without changing the current input source, press the [MODE] button and within about eight seconds, press the REMOTE MODE button. Then, with the AV controller’s remote controller, you can control the component corresponding to the button you pressed.
*2 SP Layout button is not used for this model.
Controlling the Tuner
To control the AV controller’s tuner, press the [TUNER] (or [RECEIVER]) button. You can select AM or FM by pressing the [TUNER] button repeatedly.
- Arrow ^/v buttons-Used to tune into radio stations
- D.TUN button-(TUNER remote mode only) Selects the Direct tuning mode
- DISPLAY button-Displays information about the band, frequency, preset number, and so on.
- CH +/– button-Used to select radio presets
- Number buttons-Used to select radio stations directly in the Direct tuning mode. Also you can select a preset directly
Note:
An Onkyo cassette recorder connected via RI can also be controlled in Receiver mode.
Comments
0 comments
Article is closed for comments.